Showing posts with label sew along 1. Show all posts

Friday, March 16, 2012

Coin Wrap to Bedlah Sew Along Task 10: Lining and Finishing Belt

It only took me 7 months to get here but look what I have to show for it!

Supplies:
  • All-purpose sewing thread
  • All-purpose sewing needle
  •  Sew on bar and hooks
  • Sew on snaps (optional)
  • Scissors
  • Pins and safety pins (optional, for fitting)
  • Tape Measure (optional, for fitting)
At last, we've come to the end of this sew along. I hope followers have enjoyed my adventures in costume making. Above all, I hope some of you get involved in making your own costumes or at least developed a better appreciation for the professionally made costumes from quality supplies that cost big bucks.

Not a lot to report in this last post. We just have to add the lining and hooks. It's pretty straight forward and very much like finishing the bra. If you have any burning unanswered questions please make a comment or contact me via the info in the About tab.

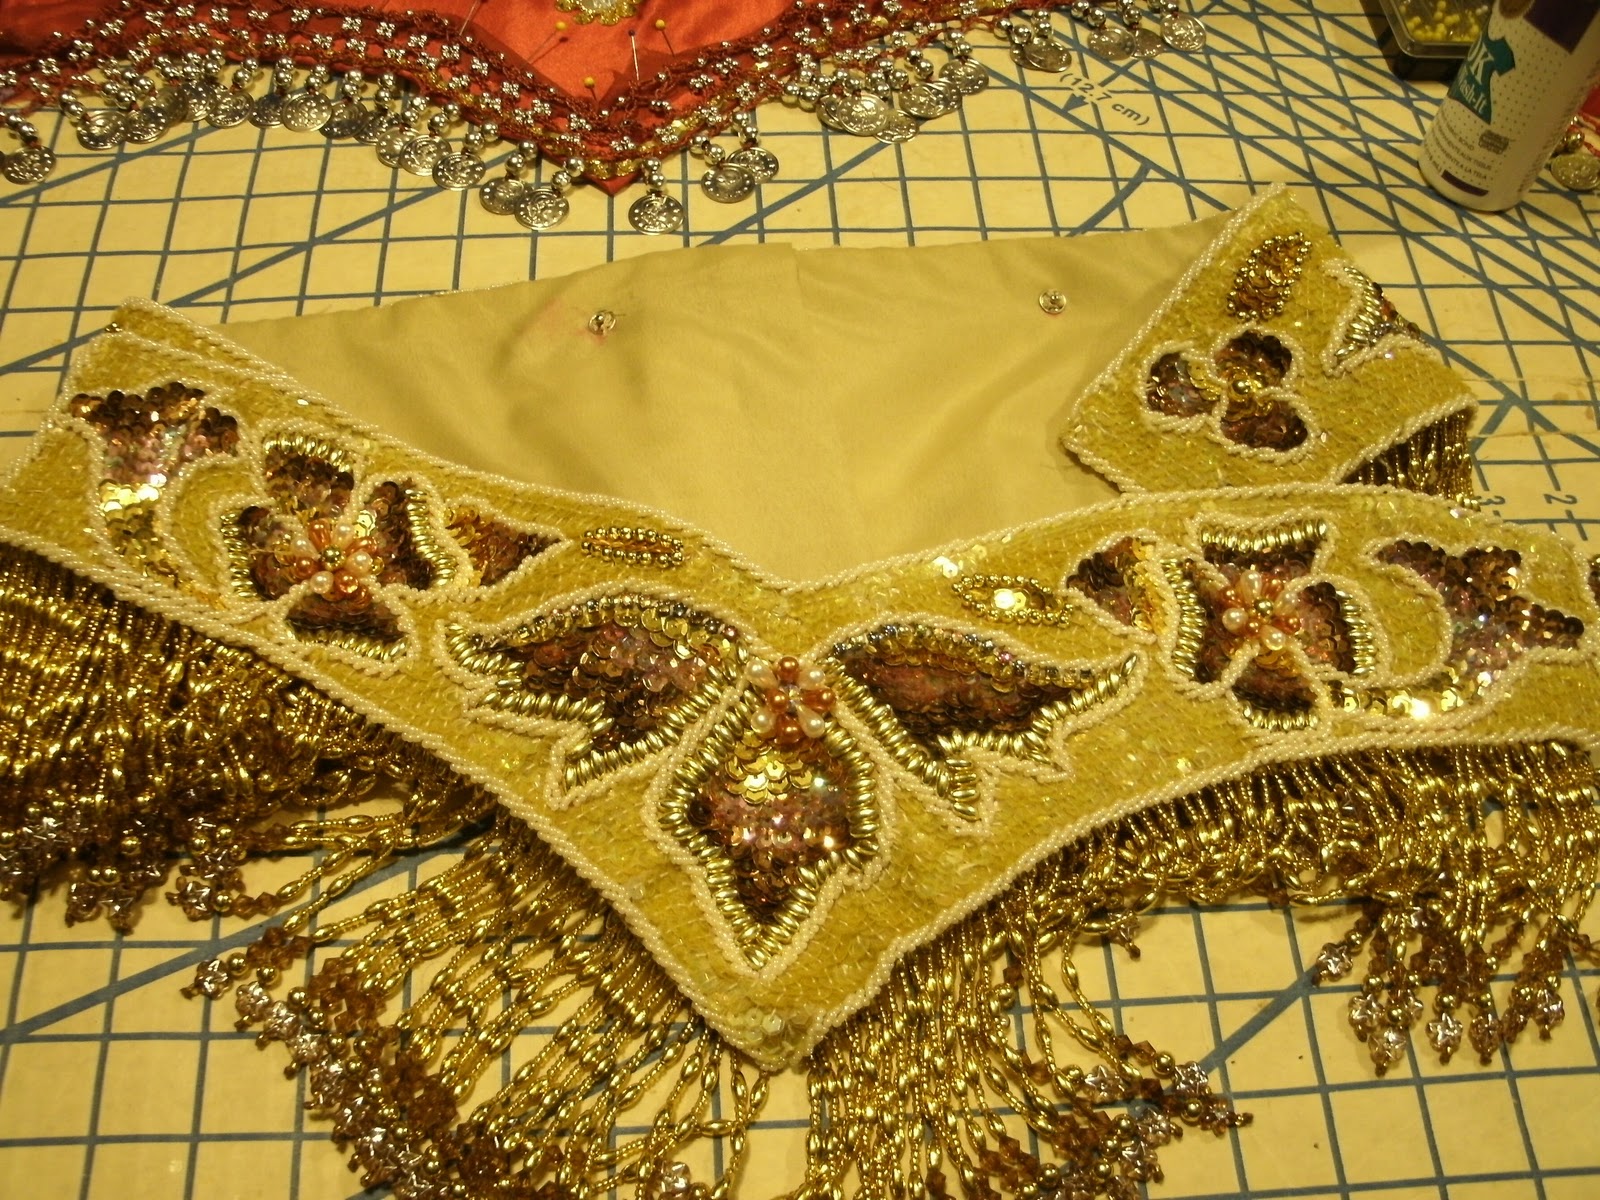
The back of the belt before the lining goes on.

Lining edge folded under with a blanket stitch holding it in place.

More of the same

A neat and tidy bottom edge. 

Reality...my dining room table covered with all manner of sewing supplies.

Whip stitches are probably a hair quicker to sew but I prefer the smooth straight blanket stitches.

Our super sexy green 60's couch modeling the completed belt.

Now some gratuitous close-ups...


At this point, I pinned the belt together and marked how much overlap there would be and where the hooks would be located.

Snap and hook hidden in the bead work.

Inside view where I have sewn one side of the belt closed. I have about 2 inches of leeway for size adjustments. Since I saved this step for last, I can easily rip out the stitches, adjust, and resew without cutting into any bead work or fabric.

The sewn together edge from the front. There is barely any bulk from the overlap at all.

I stitched around all of the overlap edges accept this small section. If I ever have to re-size the belt I do not want big needle marks in the exposed satin. I only stitched in places where it is hidden by bead work or fringe.

A hook at the top. A hook at the bottom. A snap to keep the flap from sliding around while dancing.

I don't like trying to aim the needle through those little holes. My stitches don't look too bad for once.


The corresponding bars and snap on the other side of the belt. Can you see the snap hidden between my fingers under the two middle rows of gold bead work?

Funny story here. I sewed one of the snaps on backwards. This created two "male" ends instead of a male and female. I tried on the costume and felt a "snap" when it was pushed together. Everything fit fine. The next performance rolls around and I'm backstage getting ready and discover the snaps don't actually work. Luckily the two hooks where enough to hold everything together.

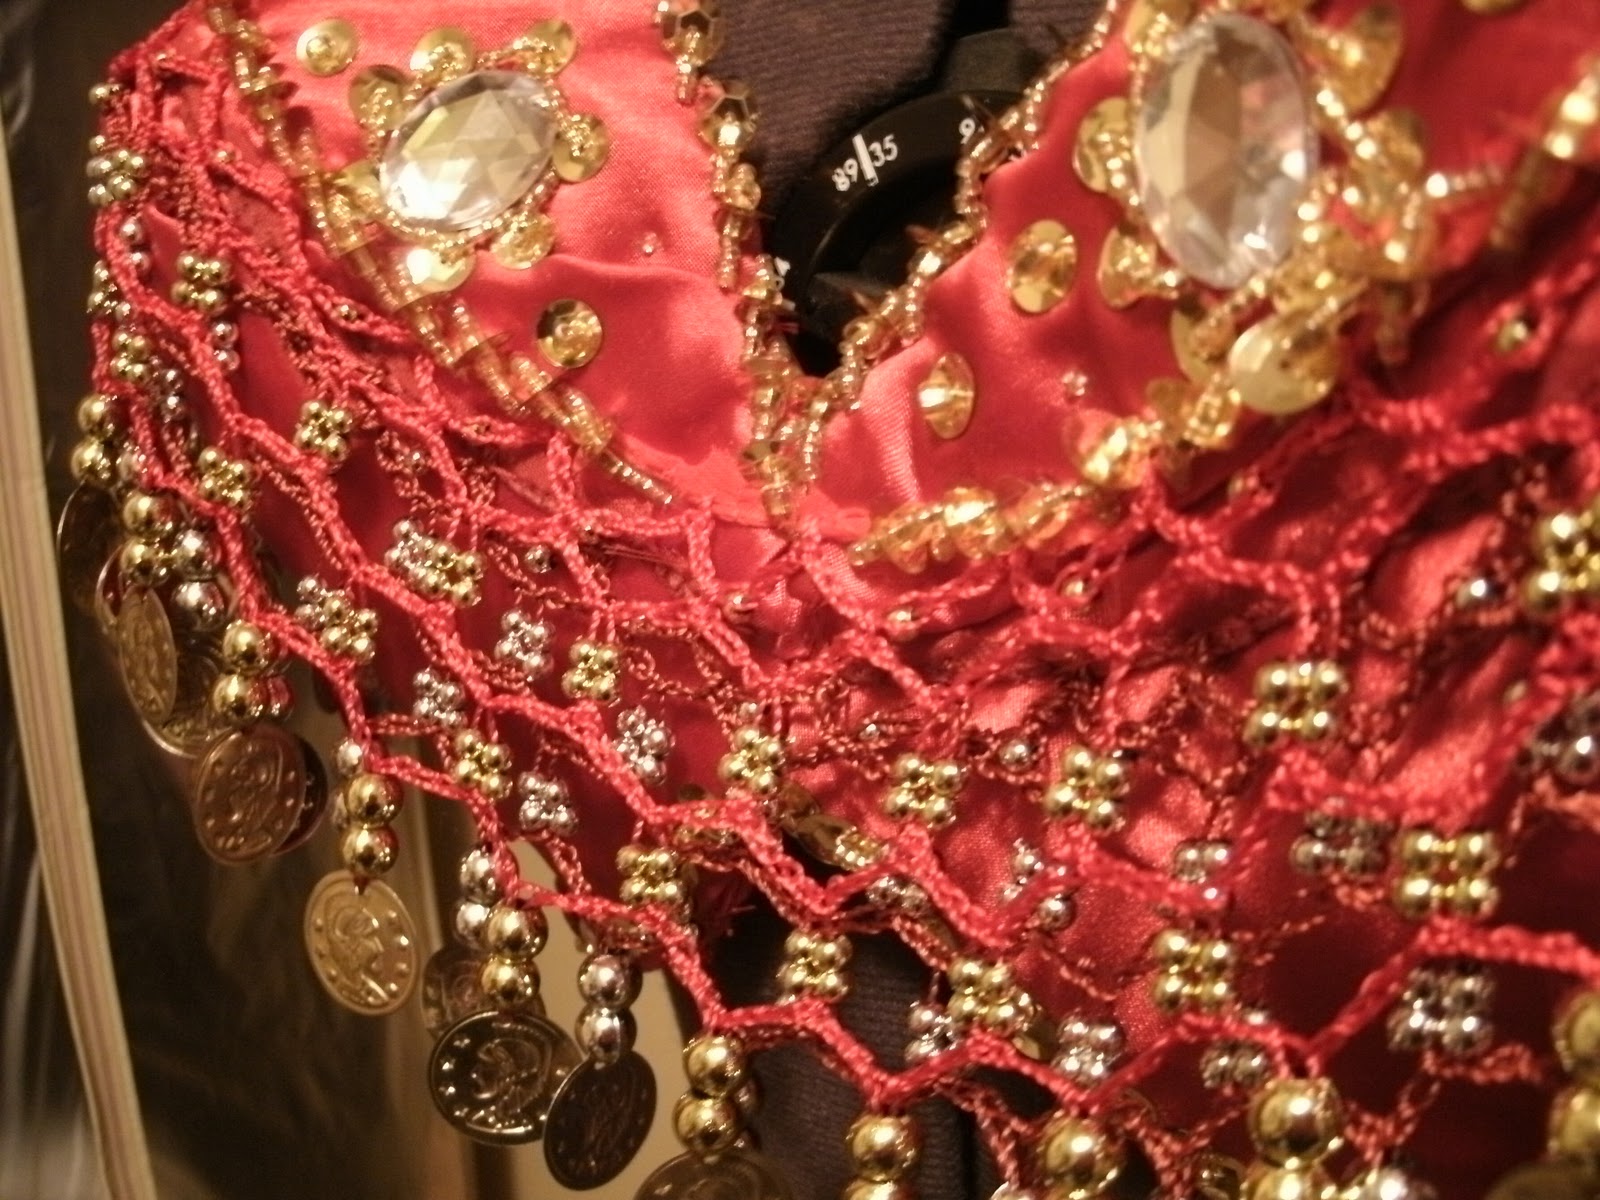
Coin fringe detail. Look at all of those little Romans. Eventually, the metallic coating will rub off of the beads but I think the mix of silver and gold will make it appear antique as apposed to just plain cheap.

BAM! Rocking the finished bedlah in my bathroom, paired with a red velvet mermaid skirt and cuffs. It actually turned out pretty close to my original design.

Alternatively, the bedlah paired with coin wrap skirt and black pants underneath. pic:C. Wells

Ta Da! (What is going on with my arms?) The sleeves are a pair of tights with the feet and crotch cut out to make a shrug.  pic:C. Wells


It's hard to believe I started with a few coin wraps, some old clothes scraps, and a few bucks worth of sequins and beads. Check out the Flickr slideshow above and see how far we've come. Join the Flickr Sew Along group and add your own pictures at http://www.flickr.com/groups/bellydancesewalong/.

 As always, have fun and good luck!

~N

P.S. I've spent too much time looking at red fabric over the past year. I now have 3 red costumes and a 25+ yard skirt in the works that's just about finished. When it is done I am officially done with the color red.

Tuesday, February 28, 2012

Coin Wrap to Bedlah Sew Along Task 9: Decorating part 2

 Fabric glue applied to the crochet where cuts will be made.

Are we there yet?

Almost. Seeing as how this is a continuation of the previous post using the same techniques from decorating the bra, I will not be going into redundant detail. Instead, lots of pictures of the process. There is only one more post to follow that will conclude the Coin Wrap to Bedlah Sew Along. Hallelujah!  

Enjoy


More progress and pictures in coming in part 2 of decorating. Want to see ALL of the pictures from my bra build? Join the Flickr Sew Along group and add your own at http://www.flickr.com/groups/bellydancesewalong/.

~N

P.S.
There have been some problems with the comments section not working. Anyone still having problems?

Tuesday, February 07, 2012

Coin Wrap to Bedlah Sew Along Task 9: Decorating the Belt (1)

It's starting to come together.

Supplies:
  • Remaining coin wraps 
  • Sew-on acrylic gems
  • Sequins
  • Seed beads
  • Rocaille beads
  • Beading needle and Beading thread or equivalent (I use upholstery thread)
  • All-purpose sewing thread and needle
  • Pins
  • Fabric glue
  • Scissors
Decorating the belt will come in 2 parts just to spread it out a bit. I will repeat the design from the bra on to the belt. I added a bottom row of sequin trim and spaced out the acrylic gems along the belt followed by the bottom row of coin fringe from the hip wraps.

Getting things started with trim on the bottom and acrylic gems along the top.

Close up

More of the same

Cutting the rest of the coin belts into strips.

I trim the chiffon down to about 1 inch salvage around the crochet work.

Starting with the bottom layer of coin fringe to be placed on the belt, I pin on the fringe and mark where it needs to be trimmed (top photo.) I use fabric glue to secure the bead work where it will be cut. Once dry, I cut right down the middle of the glued section of crochet. I will stitch this row of fringe on and do the same for the second row.

More progress and pictures in coming in part 2 of decorating. Want to see ALL of the pictures from my bra build? Join the Flickr Sew Along group and add your own at http://www.flickr.com/groups/bellydancesewalong/.

~N

Wednesday, January 25, 2012

Coin Wrap to Bedlah Sew Along Task 8: Making a Belt Base


Supplies:
  • Base Fabric
  • Interfacing, felt, denim, or equivalent
  • Paper, pencil, tape
  • Measuring tape
  • All-purpose sewing thread and needle (or sewing machine)
  • Scissors 
  • Pins

Hey, Hey! I am getting back into the swing of things Well, a little at least. I've actually had this part of the sew along done for a few weeks now but have not been able to put it all together. So far the belt is going much smoother and faster than the bra, working with a fairly flat surface and all. All the base construction can be done with a sewing machine. That speeds things up a lot.

My original plan was to make a V-shaped belt because (for me anyway) the shape seems to fit around curves easier, with less darting and altering than other shapes. But as you will see, it changed into a heart-shaped belt part way through the process.

The pattern I made based off of the Sage Applique belt only with a much deeper V and higher, narrower sides. I just realized the pattern says 4.5" instead of the 5" that is clearly marked on the graph paper.

I took my hip measurement, divided it in half (for front and back), added 2 inches of overlap, and then drew a V to the depth I wanted. I recommend not going  over 5-6" at the thickest part of the belt. I have noticed that plus sized dancers that have a wider hip measurement tend to also add inches to the height of the belt and throw the visual proportions off. Just because you may be fuller figured doesn't mean you are also taller, and vice versa.

I've been altering another of Sa'dia's costumes and really liked the front of this belt. I also liked that the front and back of the belt are completely separate and finished pieces. It is sewn together on one side with hooks on the other side. The front piece overlaps the back piece like a giant belt buckle. I have read that this type of belt is easier to take apart and re-size than a belt that is a continuous piece but never really understood how it was sewn together. After studying it's construction, I decided to toss my belt pattern and make a belt similar to this.

This side of the belt is sewn together and looks just like the other side with hooks. It isn't as bulky as I thought it would be. To alter it, you only need rip out the stitches, move, and restitch. This way there is no need to add or remove sequins, cut length off, add length, or redo the lining when resizing.

 The inside of the sewn edge.

I used the same hip measurement from the first pattern and traced Sa'dia's heart-shaped belt onto an old pair of khaki denim jeans for the front and back of my new belt. I added 2 inches to each side of the back piece for overlap. I intend on overlapping both sides (one stitched in place, the other with hooks) just like Sa'dia's belt. I then measured the base fabric with 1inch of overlap. I also wrote myself a note for posterity.

I had already covered the front of the belt with fabric when I realized it was only one layer of denim thick. Oops. I cut a 2nd layer and carefully stitched it on as close to the edge as possible, (it looks kinda pretty.) Then I covered 2 layers properly for the back of the belt making shallow cuts along the edge to allow the fabric to curve smoothly. No darts where needed. The belt base is now ready for decoration.

Next Task 9: Decorating!

Supplies:
  • Remaining crocheted coin fringe from hip wraps used on bra
  • Beading needle
  • Sequins
  • Rocaille beads
  • Seed beads
  • Acrylic sew-on jewels
  • Upholstery thread/Beading thread
  • Scissors 
  • Pins 
  • Fabric glue  
Want to see ALL of the pictures from my bra build? Join the Flickr Sew Along group and add your own at http://www.flickr.com/groups/bellydancesewalong/.

Good luck and have fun!
~N

Tuesday, December 20, 2011

Coin Wrap to Bedlah Sew Along Task 7: Lining, Hooks, and Finishing


Betty, (my dress form,) just doesn't have the right kind of rack to show off the bra. It looks much nicer on me than her.

Supplies:
  • Lining Fabric
  • All-purpose sewing thread and needle
  • Upholstery thread
  • Scissors 
  • Pins
  •  Hook and bar fastener
  • Sew-on snap
  • 20g jewelry wire*
  • Jewelry pliers and/or wire cutter*
(UPDATE 12/28/11 - I forgot to mention that the lining material I used is from old club curtains from GX. The fabric is fire retardant for those times when I just burst into flames.=P )

 20g jewelry wire and some floral wire cutters.

I left jewelry wire off the last Sew Along post (which is now updated,) as a supply to use before lining the bra. This step is *optional but if you are using soft-ish bra materials like I am it really makes a difference on how the cups curve to your chest.


I very carefully coil the end of the wire with the cutters to stop the ends from poking through the fabric once sewn on. Needle nose pliers would probably work better but I am too lazy to rummage through the tool box for them.

 Wire whip stitched along the upper edge of each cup using upholstery thread.

 Super un-sexy stitching in bra cups from the inside.


It is easier to handle the straps and line them before sewing them to the bra. You need a strip of lining fabric with 1/4-1/2 extra allowance to be folded under and whip stitched in place.

 Strap stitched to the cup.

 Strap stitched to the side strap of bra.

I usually pin the bra on with safety pins and mark where I want the straps to attach in the front on the cups. I take it off, sew them onto the cups, and pin them to the back/side straps. I try it all on again and check the placement on the side straps, adjust if necessary, remove pins and sew into place.

Hey, nice couch.

I don't have a pattern for lining fabric. Each bra I make is different so I cut a piece of fabric big enough to push down into the cups and have additional room to fold the edges under. This is pretty much the same process as covering the outside of the bra only in reverse. I whip stitch the lining on and trim excess fabric as I go.


I always make the side straps long enough to overlap allowing for weight gain/loss. I usually use 2 hook and bar fasteners (plus a snap) but could only find one. I can add another later. The snap is there to keep the overlap from flapping around while dancing.

 I've been debating on adding more Tea Cups under the fringe for even more glitz but I can't decide. I can add them later.


The finished product rather unceremoniously laid on the carpet. 

Hooray, all done!

I could have tried it on to take pictures but it's winter. I am (at the time of this writing,) wearing a thermal under shirt, t-shirt, sweatshirt, and fingerless gloves because I am so cold. The Husband Person on the other hand is wearing a bathrobe...and that is it.

Making a matching belt is up next. Seeing as how the move plus holidays have taken priority on my time I don't plan on starting the belt until January. I am a little disappointed it is taking so long to finish the bedlah. Before the house fire and move I would have had it all finished by Christmas.

Speaking of, I hope everyone in internet land has a safe happy holiday!

Want to see ALL of the pictures from my bra build? Check out the Flickr Sew Along group and add your own at http://www.flickr.com/groups/bellydancesewalong/.

Good luck and have fun!
~N