Showing posts with label tutorial. Show all posts

Thursday, November 14, 2013

Tutorial: Getting Rid of Belt Butt-Gap

 Careful you don't trip and fall in.

I first saw the technique of using elastic to smooth away gaps in belts published in Dahlal's costume catalog, Inside the Harem. Being without imagination and a total costume newb at the time, I thought it was the best thing since sliced bread. I needed to get rid of a butt-gap on my red coin belt so I decided to show the detailed process here.

You can sew the elastic under the belt lining or right on top of it. I've done it both ways with the same results. Here I decided to put the elastic under the lining because I had the time open it up, sew in elastic, and re-close the lining. Not that it's terribly time consuming. I probably finished the whole thing in 20 minutes. But, if you are squeamish about ripping open the lining, just skip that part and go right into sewing on the elastic.

Keep in mind adding elastic won't fix every belt gap. If you have a multiple or very wide gaps, have a unique figure, or if the belt is just designed funky you may need a major alteration such as cutting and removing parts of the belt or adding darts. But for those pesky 1 inch or so gaps this seems to do the trick.

You will need:
  • Small length of elastic
  • Sturdy thread
  • Safety pin
  • Sewing needle
  • Scissors
  • Seam ripper (optional)
  • Fire (optional)
There are no rules as to how much elastic you need. I used two 3 inch-ish pieces. Two because my belt has a heart shaped curve along the back and it was easier to put a piece on each side instead of trying to curve the elastic. If the belt was straight I would have used one piece of elastic centered in the middle back between 4-5 inches long. The type of elastic really does not matter here either. I used a scrap piece I had in my stash.

  • Seam rip the lining (optional,) along the area of the gap.
  • Use a lighter or candle flame to singe the ends of the elastic to minimize fraying (optional.)
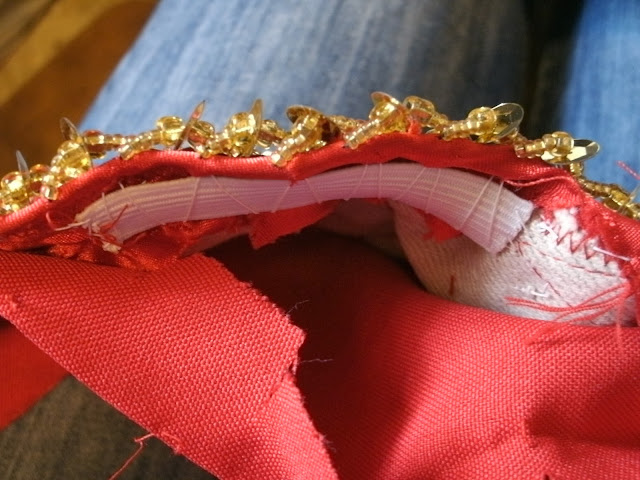
  • Anchor one end of the elastic to the inside layers (or lining) of the belt with your choice of stitch close to the upper edge of the belt. Do not stitch all the way through to the front of the belt. Make sure the elastic is secure by giving it a couple of tugs before moving on.

  • Stretch the elastic and inch or so longer then when it is at rest and safety pin it to the belt. When you stretch the elastic out it should lay flat against the belt. When you let go it should make the belt pucker along the edge. I prefer using safety pins here over regular pins because they will not slip out and I cannot stab myself on them.

  • Begin zig-zagging stitches back and forth over the top of the elastic but not through it, stitching only through the inner layers of the belt and not all the way through to the front. This will create a casing for the elastic so it will not slide around but will still be able to stretch. Keep the stitches loose. Stretch the elastic out flush against the belt every few stitches to ensure the stitches are not constricting its movement. 
  • Stitch down the remaining end of elastic then remove the safety pin. NOTE: I wanted to do it all with one long piece of thread so I stitched one side, zig-zagged across, and then stitched the other side in one pass without starting and stopping. You can stitch down both sides of the elastic first and then add the zig-zag casing across the top if that works better for you.

  •  If you put the elastic on top of the lining then you are done. Good Job! To replace the lining keep reading.
 Second piece of elastic added.

  • To close the lining, begin your first stitch 3-4 stitches back from the open edge of the lining and sew right over the top of the original stitches.
  •  When you get to the last original stitch continue sewing to close the hole you have made.
  • Once you have closed the hole continue sewing over 3-4 of the original stitches on the other side.
  • Knot and cut your thread.
NOTE: Here are close ups of the blanket stitch I used to close the lining. Needle comes in from the top, thread wraps underneath the needle, pull tight. I used a wide blanket stitch to close the opening because it is the stitch used on the entire lining. A simple baste or whip stitch would have laid much nicer. If it gets to loose I may go back and whip stitch over it.


Crack is wack.
 
The belt should now lay smoothly against your body instead of gaping around the curve of your back. You can add elastic to trouble spots on a spandex or velvet skirt in the same manner. This trick is also handy for taming bulkiness along the side straps of your bra underneath the armpit area.

Have fun and good luck!
~N 

Monday, August 05, 2013

DIY: Repurpose Damaged Hip Wrap Into Jewelry

You are shimming away in class and the next thing you know beads and coins are shooting from your hips in every direction. At first you aren't quite sure where they are coming from. For a split second you even think, "Neat, a sparkling shimmy shower." Then, with great disappointment, it hits you. Your hip wrap is starting to unravel.

You do what you can to make it last as long as possible. You gather up the coins and beads that fall off. You tie or glue loose threads together. You may even try trimming and sewing the raw edges in the hope that it will stop the offending fray from taking over the entire wrap. It is about this time you decide to donate the wrap to the "community basket". There is one at every studio. A basket full of old raggedy hip wraps for new students to share and wear during class. But alas, eventually it becomes almost impossible to wear, beads and coins raining everywhere. Your beloved hip wrap becomes an under foot nuisance that, slowly over time, gets swept up and dumped into the trash.

Before throwing your hip scarf away, (or into the back of your closet because you are too sad let it go,) see if you can repurpose it into jewelry. Use this jewelry for yourself, as gifts for dancers, or donate as door prizes or other fundraising cause.

Supplies

  • Old hip wrap with damaged, frayed, or missing coins
  • Barrettes and/or earring hooks
  • Fabric glue
  • Glue gun (and glue)
  • Thread
  • Needle
  • Scissors
  • Use the clear drying fabric glue on the cut threads to prevent fraying. See instructions here.
  • Hand stitch the chiffon fabric in a "rolled hem." I type "rolled" because I just squished, tucked and folded the fabric under holding it in place with wide sloppy stitches. The chiffon area will be hidden by glue and coins so no need to make a true, fancy rolled hem.
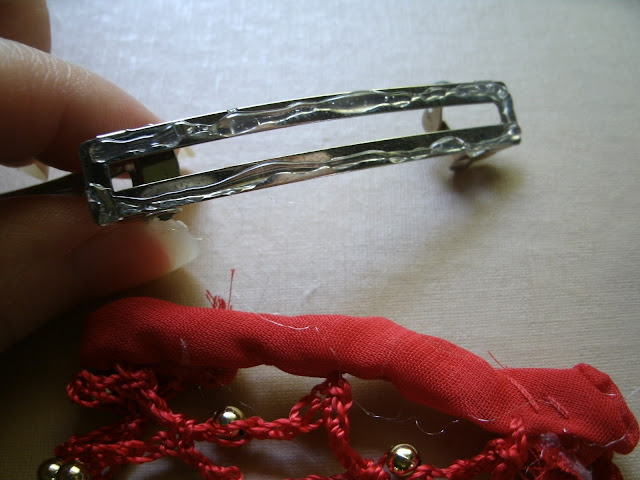
  • Cover the barrette with hot glue.
 
  • Glue the coin fringe to the barrette.
  • Hot glue some loose coins on top. All done!
  • Wear and enjoy.
An alternative to the barrette is hip wrap fringe earrings as seen in the bottom picture of this post. For earrings, make a cleaner prettier rolled hem and then hook an earring hoop through the fringe. You can make them hang long like in the photo or loop them multiple times to create a jumble of fringe for each earring.

You can really run with the idea turning larger chunks of fringe into necklaces or use smaller pieces to decorate bras, belts, armbands, headbands, you name it.

 PS. Try to look more excited about saving your old hip wrap from the trash.

Have fun and Good Luck!
~N

Wednesday, July 10, 2013

Tutorial: Shortening Straps Without Cutting Them

I need to shorten these straps 4 inches but I don't want to cut into the strap if I can help it. Cutting means loose beads and frayed ends. It also makes it harder to lengthen them in the future. I am going to open up the bra cup lining, move the strap down, and replace the lining without cutting any part of the strap.

You will need:
Seam ripper
Scissors
Thread and needle
Measuring tape
Pins or safety pins

  • First mark the amount of length you want to shorten measuring from the cup up the strap. I measured 4 inches from the the cup and marked it with a safety pin, (top pic.) Then I seam ripped off a few rhinestones that I will use to replace broken ones on the belt.


  •  Then seam rip the lining stitches to expose the strap.


  • Next, seam rip the strap off of the cup.


  • Now slide the strap down to the mark you have made making sure to tuck the end of the strap smoothly under the lining. Also, make sure the strap has not twisted and is facing the correct direction. 
  • Pin in place. 
  • Stitch the strap back onto the cup, (not shown.)


  • To replace the lining, loosen a few stitches so you have a thread tail 2-3 inches long.


  • Tuck the tail under the lining. Make sure the remaining stitches are still tight and smooth after all of the tugging you have been doing on the lining.

  • Begin your first stitch 3-4 stitches back from the open edge of the lining and sew right over the top of the original stitches.


  • When you get to the last original stitch continue sewing to close the hole you have made.

  • Once you have sewn around to the other side of the hole, repeat the process of tucking under the tail and sew over 3-4 of the original stitches.
  • Knot and cut your thread.
  • Repeat all steps on the other side and you've shortened the straps without cutting them!

Good as new!


Find more info on altering bra straps at Shushanna's costume tutorials page. She has nifty diagrams and everything.

Have fun and good luck!

~N

Tuesday, April 03, 2012

Tutorial: Removable Halter Chain

Shoulder bulge and moles...Do you know how hard it is to take a picture of your back?

This idea is old news but when I saw Sa'dia use a broken necklace as a halter chain I thought it was the most brilliant idea ever.

The pros:
  • It gives busty gals extra lift and support.
  • It keeps loose shoulder straps from falling off without any major alteration
  • It's adjustable
  • It's removable
  • You can use the same chain on any costume as long as they have hooks
  • The cost is almost nil
  • Requires novice sewing skills (we're talking easier than sewing a button.)
  • Easily removable if you sell your costume
The cons:
  • NONE!

This composition is titled, "Hooks, Chain, and a Single Ground of of Coffee."

Supplies:
  • Needle and thread
  • A piece of chain, old necklace, etc. sturdy enough that the metal loops do not pull apart with too much pressure. I used a homely little bracelet that is never worn. I didn't alter the chain length or clasp in any way.
  • 2 sew on hooks 
  • Scissors
  • Charms (optional)


Step 1. Try on and take note, or mark, the location on the straps where you want the halter chain.

Step 2. Sew the hooks onto the inside of the bra straps where you want the chain, facing in toward your back, not out toward your arms.


Step 3. Slip chain onto hooks adjusting chain to desired length.


Optional: Add charms, coins, or other cute dangly bits for added interest.

Peaking out from under my hair, the Hamsa protects my backside from the evil eye.

Now you have a cute little flash of detail that is adjustable, removable, and best of all not a safety pin!

You also have the option of making the halter chain permanent by sewing one end of the chain directly to the bra and using only one hook on the opposite side. It would still be adjustable and be suited for those who only need to halter one bra. This idea is also cheap and easy enough you could put permanent halter chains on all of your costumes.

Have fun and good luck!
~N

Monday, November 28, 2011

Sewing Tutorial: Blanket Stitching a Lining Over Fringe

Ooo, Dangly

Loose whip stitches tack the lining in place.

I was finishing up the belt for the Sage Applique costume and snapped a few pics of sewing the lining in. I normally use a loose whip stitch to hold a belt lining in place. For areas where the lining covers an edge with fringe I use a wide Blanket Stitch.

Begin by laying the belt face down on the table with the fringe facing away from you. Smooth the fringe out making sure none of it is caught under the lining. This keeps the fringe out of the way while sewing. I fold the edge of the lining fabric under as I go. You may prefer to pin it under before stitching.

Holding the belt with the lining facing you insert the needle through the belt fabric and into the lining fabric keeping the needle over the tail of the thread. (I make a tiny stitch under the lining where the knot will be hidden before making the first blanket stitch, not shown.)

Pull the needle through and the thread will loop around itself creating a Blanket Stitch.

Pull the thread tight and the new Blanket Stitch holds the thread smoothly away from the fringe.

Continue stitching as above along the line of fringe making a new Blanket Stitch after every 3-5 strands of fringe.

 Nice neat stitches hold the lining in place and allow the fringe free movement.

Boober helped focus the camera for this tutorial.

Have fun and Good luck!
~N

Monday, June 27, 2011

Bellydance Necklace Tutorial Part 3: Lining and Finishing


Now for the final most important steps, lining and finishing. Don't skimp on this project and decide not to line the necklace to save time. A lining will protect all of the hard work you put into beading as well as soak up sweat while you dance. The lining is lightly stitched into place and easy to remove and replace once it becomes dirty or you need to repair any damage to the decoration.

Bellydance Necklace Tutorial Part 3: Lining and Finishing

You will need:
  • Sewing needle
  • All purpose sewing thread
  • Scissors
  • "Something Round" used in part 1
  • Small amount of base fabric or felt (reference part 1)
  • Marker 
  • 1 sew-on snap
  • Pins (optional)
  • Iron (optional)


Using the "something round" from part 1 of this tutorial, cut out enough fabric to cover the back of the medallion plus 1/4-1/2 inch allowance. This is the lining. Do the same for both straps. If necessary, use an iron to press the seam allowances so they are easier to fold under during sewing, (see photo.)

Do not include a seam allowance if you are using felt. Felt will not fray and does not need to be folded under. Cut the felt slightly smaller than the medallion and straps so that it will cover the back but not hang over the edges, (not pictured.)


Lightly tack lining to the straps by folding the edges under and stitching along the folded edge of the lining and into the back edge of the strap. Use pins to hold the lining in place if needed. Only stitch through a small amount of fabric. Do not stitch into the bead work, (see photos.)


Once both straps are covered, cover the medallion in the same way. Make shallow cuts around the curve of the lining fabric. This will help the fabric lay flat as you fold it under. Be careful not to cut these too deep. I was too zealous with my cuts and had to start over with a new piece of fabric.


Sew a snap closure on the ends of the straps according to the instructions on the package.


Congratulations, you are done! Pat yourself on the back.

Here are some things to consider when making your own beaded necklace:

Design - My primary dance style is cabaret so my necklace is gold and flashy. However, these techniques will work if you are a Tribal, Fusion, or other style dancer. Change the color scheme to darker fabrics and beads that more appropriately fit your look. Instead of glass beads use wood, metal, or shell. Add charms or a piece of kuchi to the medallion instead of an overly feminine flower. Add bells or coins to the fringe tassels. You get the idea.

Time - This project took me around 7 hours over the course of 3 days to complete from start to finish, (not counting shopping for supplies.) Granted, I did stop and start often to take photos but I have also made this style necklace before and already knew what I was doing. Keep this in mind before diving into a major costuming project. Do you really have the time and patience for such a commitment? Would it be worth the money to buy pre-made costumes instead of spending so much time creating them? Just a thought.

Supplies - I did not specify the amount of sequins and beads to buy because they are sold by weight not quantity. I did a final count of the bead work for curiosity's sake and here are my numbers. Now you can appreciate how much work goes into beading costumes.

66 Sandwiches
126 1/2 Ropes
12 Rope Arches
4 Tassels
34 Fish Scales
3 extra seed beads in the flower

For  a grand total of 19 seed beads, 166 sequins, and 1373 rocaille beads.


I hope you enjoyed this tutorial and are able to apply some of these techniques to your own costuming projects. This necklace will be raffled off as part of YIP Podcast's upcoming Propapalooza workshop. If you haven't already, go check them out. They're a hoot! I made sure to put my cooties on the necklace first...I mean model it. =P

~N