

We will be using the following beading techniques to decorate the necklace. Please be familiar with each before moving on.
Supplies and Tips, Ropes, The Sandwich, Fish Scales
Bellydance Necklace Tutorial Part 2: Decoration
You will need:
- Beading thread
- Beading needle
- Scissors
- Sequins 8mm or smaller, or both (you'll see what I mean)
- Seed beads
- Rocaille beads
- Tray/lid to hold your beads (optional)
- Thimble (optional)
There are many pictures to follow. To help keep things clear here is a summary of beading sections for each part of the necklace.
- Fish Scale flower in center of medallion.
- Row of Sandwiches around flower and down the middle of each strap.
- Ropes around edge of medallion and down each side of both straps.
- Rope arches around outer edge of medallion.
- Tassels.
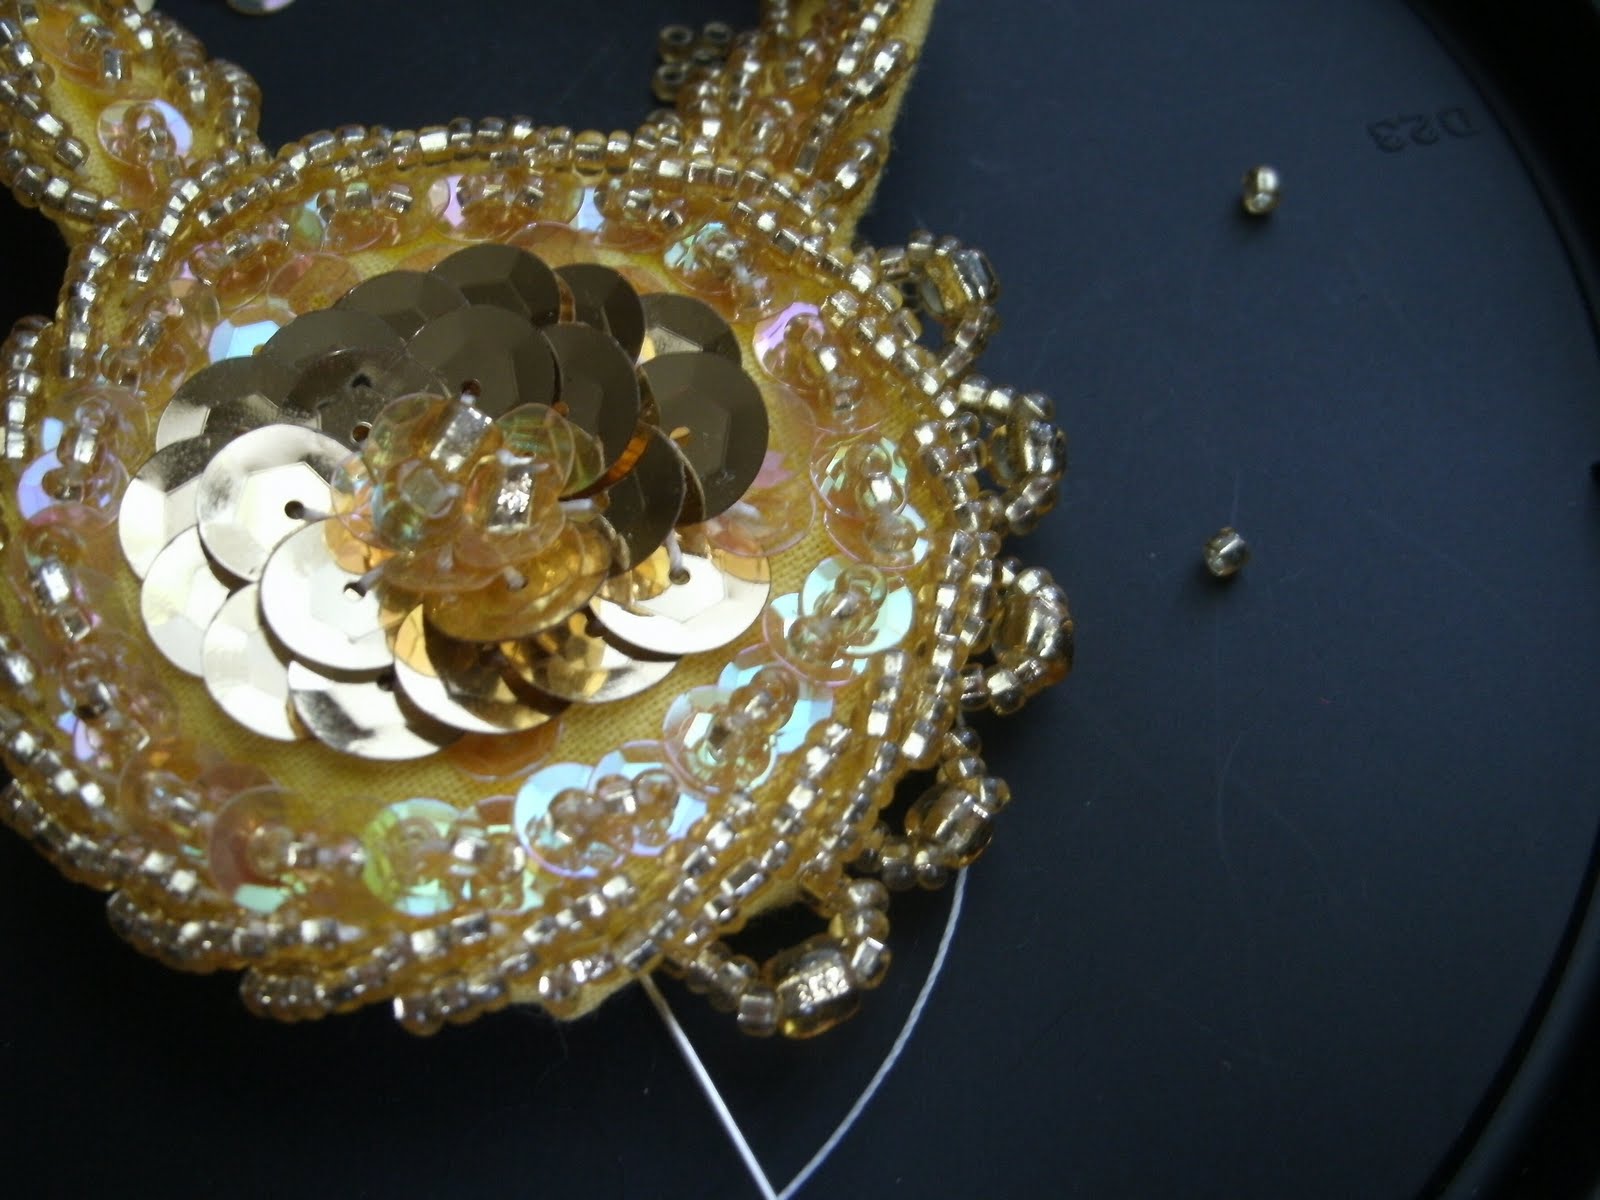
1. Fish Scale flower in center of medallion.

Start by making a flower in the center of the medallion. Begin stitching on a circle of Fish Scales and continue circling inward keeping the sequins tightly overlaid.
I was halfway through the flower when I decided to change from 8mm gold sequins to smaller iridescent sequins. You do not have to change sequins. This is completely optional but looks pretty neat.
Once you reach the center add 3 seed beads in the center to finish the flower.

Tiny iridescent sequins in the center of the flower (seed beads not shown here.)
2. Row of Sandwiches around flower and down the middle of each strap.

I decided to use the smaller sequins for the rest of the necklace as well. I am working with what I have and designing on the fly.
Next, using sequins of your choice and rocaille beads, make a ring of Sandwiches around the flower. Then place a row of Sandwiches down the middle of each strap. Leave an inch at the end of one of the straps un-beaded. This space will be where we sew on the snap.

Sandwiches on a strap

A 1inch section left for a snap.
3. Ropes around edge of medallion and down each side of both straps.

Medallion Ropes from top view

Medallion Ropes side view

Medallion Ropes complete

Ropes down edge of strap

Another view of Ropes on strap

Close-up of Rope work on strap

It was somewhere around this point I decided there was too much yellow fabric showing around my flower. I stitched a few extra Fish Scales around the outer edge of the flower using more of the iridescent sequins to fill it in. You can see them in this picture. This is more designing on the fly.
4. Rope arches around outer edge of medallion.

Next is a variation on the Rope technique to line the outer edge of the medallion. Pull the threaded needle up through the very outer edge of the medallion next to one of the straps. Load 4 rocaille beads, 1 seed bead, and 4 more rocaille beads onto your needle. Instead of laying the Rope flat, insert the needle close to where the thread comes out of the fabric to create an arched Rope.

First Rope Arch from the back

Inserting the needle preparing for the next Rope Arch from the back
Continue to bead arches around the outer edge of the medallion by inserting the needle right next to the previous stitch, (see photo.)
Rope Arches from the top

I did not bead arches between the two straps. I preferred the way it looked without a complete circle of arches. You can bead all the way around if you like. It is your choice.

Tassels are something I have not previously covered on a tutorial but are very easy. The length of the tassels is up to you. You can make them all the same length or various lengths.
Insert the needle near the center bottom of the medallion in the back layers only. Do not stitch all the way through. Load a string of rocaille beads onto the needle followed by 1 seed bead. Slide all of the beads down toward the medallion but not completely flush.
Insert the needle back through all of the rocaille beads but not the seed bead. Pull the thread tight to create a tassel. The seed bead on the end acts as a stopper to keep the rocaille beads from sliding off. Tie the thread off with a few stitches on top of each other next to the original stitch into the fabric and begin the next tassel. Continue adding tassels until you are satisfied. Tie off and trim the thread.

Be sure not to pull the tassel thread super tight. You want it to have a little room to dangle and not stick out completely straight. Give each tassel a little wiggle to see if it swings freely before you tie it off.
We are finished with decorating! Here is what the necklace looks like so far.

Back of necklace

Front of necklace. Notice, after I took this picture I decided I wanted 4 tassels instead of 3. There are 4 in the very top photo of the tutorial.
Next - Bellydance Necklace Tutorial Part 3: Lining and Finishing
1 comment:
Thank you! This was fabulous. I need to make a hair ornament for a half at the end of January. I now believe I know how to make something beautiful and unique.
Post a Comment